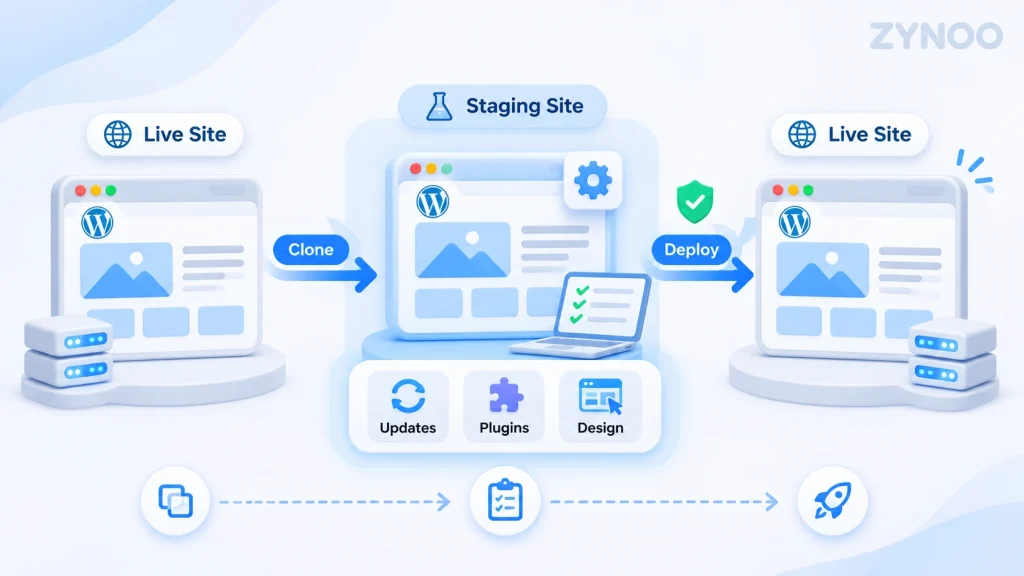
A WordPress staging site is a private copy of your live website where you can safely test updates, plugins, themes, and design changes before publishing them. Instead of experimenting on your live website and risking errors or downtime, you can make changes in an isolated environment.
Creating a WordPress staging site is straightforward when your hosting provider offers staging tools. You can also use a WordPress staging plugin or create a separate testing environment manually.
This guide explains how staging works, when you need it, and how to move tested changes to your live website safely.
Key Takeaways
- A WordPress staging site lets you test website changes without immediately affecting visitors.
- You can create staging environments through your hosting provider, a WordPress plugin, or manual configuration.
- Staging is particularly useful for plugin updates, PHP upgrades, redesigns, and WooCommerce changes.
- Protect staging websites from public access and search engine indexing.
- Always back up your live website before deploying changes to avoid accidentally overwriting important data.
What Is a WordPress Staging Site?
A WordPress staging site is a separate testing environment that typically contains a copy of your website’s files, database, themes, plugins, and settings.
It allows you to experiment with changes while keeping your production website running normally.
For example, imagine you want to install a new WordPress theme. Changing it directly on your live website could disrupt layouts, menus, or functionality.
With staging, you can preview the theme, identify issues, and make adjustments before publishing anything.
Staging Site vs Live Website
| Feature | Staging Site | Live Website |
|---|---|---|
| Purpose | Testing and development | Public website |
| Accessibility | Restricted access | Accessible to visitors |
| Search Indexing | Should be blocked | Usually enabled |
| Website Changes | Tested before deployment | Immediately visible |
| Customer Activity | Usually disabled or simulated | Real transactions and interactions |
Staging provides a safer workflow, although it does not replace regular backups or proper testing.
When Should You Use WordPress Staging?
Not every website change requires staging. Correcting a spelling mistake or publishing a regular blog post can usually happen directly on your live site.
However, staging is valuable when changes could affect website functionality.
Common situations include:
- WordPress updates: Test major WordPress releases before upgrading your live installation.
- Plugin updates: Identify compatibility problems before they affect visitors.
- Theme changes: Preview layouts, navigation, and design adjustments.
- PHP upgrades: Check whether plugins and themes support newer PHP versions.
- WooCommerce modifications: Test checkout, shipping, and payment integrations.
- Custom development: Evaluate code changes and new functionality safely.
For example, before following our guide on how to update PHP in WordPress, consider testing the intended PHP version on staging to identify potential compatibility issues.
How to Create a WordPress Staging Site
There are three main approaches. The best option depends on your hosting environment and technical experience.
Method 1: Create a Staging Site Using Your Hosting Provider
Hosting-based staging is generally the easiest option because it requires little manual configuration.
Many WordPress hosting providers offer staging through their hosting dashboards or WordPress management tools.
For example, hosting accounts using Softaculous may provide the following workflow:
- Log in to your hosting control panel, such as cPanel.
- Open Softaculous Apps Installer or WordPress Manager by Softaculous.
- Locate your existing WordPress installation.
- Select the Staging option.
- Choose a staging directory or subdomain, such as
staging.example.com. - Review the installation settings and create the staging copy.
- Open the staging website and confirm that it works correctly.
Softaculous creates a separate installation for testing. Its staging and deployment capabilities depend on your hosting configuration.
Some cPanel environments instead provide WP Toolkit, where cloning and staging may require the Deluxe features.
If your hosting provider offers a different staging interface, follow its specific instructions.
When comparing hosting providers, consider whether staging is included. Our guide to choosing the best WordPress hosting covers other essential hosting features.
Method 2: Use a WordPress Staging Plugin
If your hosting provider doesn’t include staging, a dedicated plugin can help.
WP STAGING is one option that supports creating a staging copy of an existing WordPress website.
To get started:
- Open your WordPress dashboard.
- Navigate to Plugins → Add New Plugin.
- Search for WP STAGING.
- Install and activate the plugin.
- Open its staging management interface.
- Create a staging copy using the available options.
- Access the cloned website to begin testing.
The free version supports staging creation, but pushing staging changes directly to your live website requires the Pro version.
Review plugin limitations, available disk space, and hosting compatibility before proceeding.
Method 3: Create a Staging Website Manually
Advanced users can create staging environments without dedicated tools.
This involves creating a separate subdomain or directory, copying website files, duplicating the database, and updating WordPress URLs and configuration settings.
Manual staging provides more control but requires experience with databases, hosting configuration, and WordPress file management.
For most beginners, hosting-based staging or a dedicated plugin is the safer choice.
How to Secure Your WordPress Staging Website
Staging websites often contain copies of real content, user accounts, and potentially sensitive information.
Leaving them publicly accessible can introduce unnecessary security and privacy risks.
Follow these precautions:
- Enable password protection: Restrict access to authorized users.
- Prevent indexing: Configure staging pages with appropriate
noindexsettings. - Disable live transactions: Use test payment gateways instead of processing real payments.
- Stop unwanted emails: Prevent staging from sending notifications or newsletters to customers.
- Review integrations: Disable scheduled tasks or connections that could modify production data.
The WordPress Settings → Reading → Discourage search engines from indexing this site option can help, but it does not guarantee privacy. Password protection is a stronger safeguard.
For additional precautions, review our WordPress security best practices.
What Should You Test on a Staging Website?
Creating staging is only the first step. You must verify that everything works correctly before deploying changes.
Use this checklist:
- Website design: Check layouts, images, menus, and responsive behavior.
- Plugins and themes: Confirm updated components work without conflicts.
- Forms: Test contact forms, registrations, and other submissions without contacting real customers.
- Navigation: Look for broken internal links and missing pages.
- PHP compatibility: Identify warnings and errors after server-side updates.
- WooCommerce: Test cart and checkout functionality using sandbox payment methods.
- Performance: Check page loading behavior and review error logs.
If an update produces a blank page or internal server error, investigate the cause before deploying it.
Our guide to common WordPress errors and how to fix them can help troubleshoot frequent problems.
How to Push Staging Changes to Your Live Website
After successful testing, you can deploy the approved changes to production.
The exact process depends on your hosting provider or staging plugin.
Step 1: Back Up Your Live Website
Create a fresh backup of your files and database immediately before deployment.
Verify that the backup can be restored if something goes wrong.
Step 2: Review What Has Changed
Determine whether your updates involve website files, database content, or both.
This distinction is especially important for WooCommerce stores and membership websites.
Step 3: Select the Appropriate Deployment Options
If your staging tool supports selective deployment, choose only the files or database changes you need.
Important: Replacing the entire live database can overwrite orders, customer registrations, comments, or other information created since the staging copy was made.
Some updates require database changes as well as files, so don’t assume a files-only deployment is always sufficient.
Step 4: Deploy and Verify
Run the deployment using your staging tool’s instructions.
Afterward, check your live homepage, important pages, forms, and checkout functionality.
Clear applicable caches and monitor website errors.
Common WordPress Staging Problems
A few issues can occur during staging setup or testing.
Insufficient disk space: Cloning creates additional files and database content. Check your hosting storage before starting.
Broken links or redirects: Incorrect website URLs can cause staging pages to redirect to production. Review your staging configuration.
Plugin licensing issues: Some premium plugins require separate authorization for staging environments.
Unexpected emails or transactions: Disable production integrations and use testing modes where available.
Slow staging performance: Staging environments sharing server resources with live websites may affect performance during resource-intensive operations.
If problems persist, review your hosting documentation or contact your provider.
Final Thoughts
A WordPress staging site provides a practical way to test changes before they reach your visitors.
For most website owners, hosting-based staging is the simplest option. Plugins provide an alternative, while manual staging is useful for developers needing additional control.
Whichever method you choose, protect the staging environment, test important functionality, and create a backup before deployment.
The goal of WordPress staging is simple: identify problems before they affect your live website.